views

Open Steam on your computer. The Steam app looks like a white crankshaft icon in a blue circle. You can find it on your Start menu on Windows or in the Applications folder on Mac.

Click the Steam menu on the top-left. This will open a drop-down menu of your options. On Windows, this button is in the upper-left corner of the Steam app window. On Mac, it's on the menu bar in the upper-left corner of your screen.

Click Settings (Windows) or Preferences (Mac). Find and click this option on the Steam menu. It will open your settings in a new pop-up window.

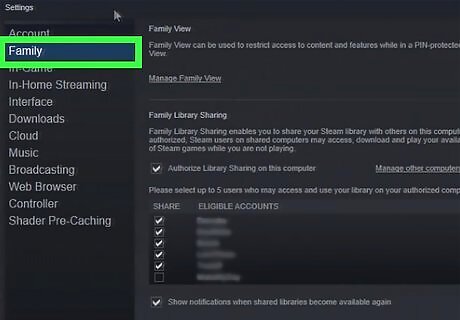
Click the Family tab on the left menu. You can find this option between "Account" and "In-Game" on the left-hand side of the Settings/Preferences window.

Check the Windows Unchecked Authorize Library Sharing on this computer option. You can find it below the "Family Library Sharing" heading on this page. When this option is checked, a new box will appear at the bottom with a list of all the eligible accounts for sharing.

Check the Windows Unchecked box next to the users you want to share your library. Find the users you want to share your games with under "ELIGIBLE ACCOUNTS," and check the box next to them. Your friend must have been signed in to Steam at least once on your computer in order to appear on the Eligible list here. Both you and your friend must have Steam Guard enabled on your accounts in order to share.

Click the OK button. This will save and apply your new settings. The eligible friends you authorized will now be able to download and play games from your library on your authorized computers. You can't play the same game from your library at the same time as your shared friend. If you're prompted, click RESTART STEAM to reboot the client, and apply your new settings.


Comments
0 comment