

Building the Catio Frame
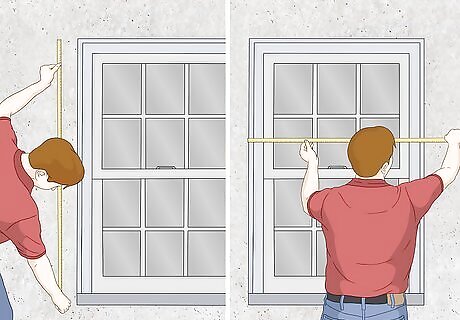
Measure the height and width of the window frame. Use a measuring tape to figure out the height of the window frame from the windowsill to the top of the window. Then, measure the width from each of the outside edges of the wooden decorative framing around the window. Make the catio frame as tall as the sashes, the moveable parts of the window that hold the glass, and wide enough to connect to the side casings.
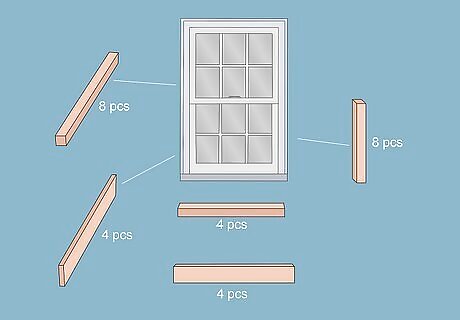
Cut the wooden boards for the catio frame using a miter saw. Cut eight 2x2 cedar posts to half the height of the window. Cut four 2x2 crosspieces for the front and the back of the catio to the width of the window. Cut eight 2x2 crosspieces for the side of the catio and two 2x2 support pieces 6 inches (15.24 cm) smaller than the width of the window. Cut four side-facing 1x4 trim boards 2 ¾ inches (6.98 cm) longer than the 2x2 side-facing crosspieces and the other four front-facing 1x4 trim boards 3 inches (7.62 cm) longer than the front-facing crosspieces. The two 2x2 support pieces lie in the center of the frame towards the house, reinforcing the roof and the floor of the catio. The eight 2x2 vertical boards make up the height of the top and the bottom halves of the catio. The trim boards wrap around the base and the top of the frame. If you’d like to match the look of the rest of your house, paint your wooden frames with an outdoor-rated paint or stain before attaching the screen material.

Start to build the internal frames using side-facing crosspieces. Lay a crosspiece down on the table and place another two crosspieces at the edges, creating a U-shape. Drill one 2 ¼ inch (5.7 cm) screw into each of the two crosspieces at an angle into the crosspiece at the bottom of the U. At the open end of the U, attach another crosspiece on top of the two other boards and drill in two 2 ¼ inch (5.7 cm) screws at an angle. Repeat this step to build the other side of the lower frame and both sides of the upper frame. Coat any newly exposed wooden ends with paint or stain. The crosspiece that sticks out from the other three will create a ledge where the floor of the catio will sit. You will eventually attach the two frames to create a multi-level catio for your cats that goes over your entire window.

Add the trim boards to the outside of the crosspieces to create a frame. Stand up both of the crosspiece sides you assembled in the previous step so that the crosspiece that sticks out from the other three is on the bottom. Lay the front and side-facing trim boards against the crosspieces so that they create a border around both sides. Drill 1 ⅝ inch (4.12 cm) screws through the front-facing trim boards into the side-facing trim boards, then drill screws through the front-facing trim boards into the crosspiece sides. Place a 2x2 support piece in the center of the frame facing the house and attach it with two screws through the front and back trim boards. Repeat this process on the upper frame. At this point, the frame should look like an incomplete box with a wooden ledge at the bottom, on the inside of the trim board frame.
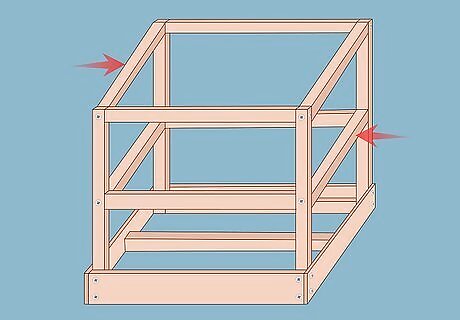
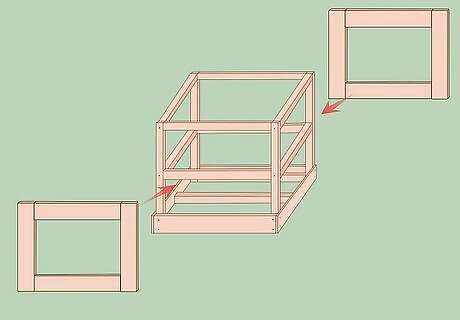
Add the front-facing crosspieces to complete the tops of the frame. Use a drill to drive 1 ⅝ inch (4.12 cm) screws at an angle through the tops of the vertical 2x2 crosspieces into the ends of the front-facing crosspieces. Repeat this step for the other frame. You should now have two complete box-shaped frames, one for each half of the catio.

Construct the floor of the catio using a plywood sheet. Measure the width and length of the frame inside the trim boards and cut a sheet of plywood to fit inside. Use a pencil to draw a 1 ½ inch (3.81 cm) by 1 ½ inch (3.81 cm) square at each corner of the plywood sheet and cut them out using a jigsaw. Place the sheet inside the frame to make sure it fits, then set it aside to install once the catio frame is mounted onto the brackets. These square notches should fit around the side crosspieces, allowing the plywood sheet to slide into the bottom of the catio. This step is only for the bottom half of the catio—for the upper half, you will build a shelf so the cat can enter through the window on the bottom and climb up to the second floor.
Assembling the Screens for the Catio
Cut 1x4 boards for the four side screen frames using a miter saw. Measure the length of half of the catio from the top of the side-facing trim boards to the top of the frame and cut eight 1x4 vertical side boards to size. Measure the width of the catio from the outer edges of the crosspieces, and subtract 7 inches (17.78 cm) so that the remaining 8 1x4 boards will fit horizontally between the vertical side boards. Cut the horizontal boards to create four complete frames.

Use a miter saw to cut the 1x4 boards for the two front-facing screen frames. Use the same length measurement from the previous step and cut four 1x4 vertical front-facing boards to size. Measure the width of the front of the catio from the edges of trim boards, and subtract 7 inches (17.78 cm) so that the four 1x4 horizontal boards will fit between the vertical side boards. Cut the horizontal boards to complete the two frames.

Attach the 1x4 boards together into frames using wood glue and screws. Glue together the edges of the horizontal 1x4 boards and the bottom edges of the vertical 1x4 boards to create a rectangle frame. Drill pilot holes at an angle inside the frame, from the horizontal 1x4 boards into the vertical 1x4 boards. Then, drill in 2 ¼ inch (5.7 cm) screws. Repeat this step for all six of the frames that will line the side of the catio.
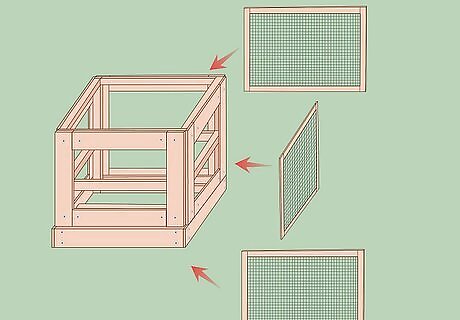
Stretch and staple mesh to the frames using a stable gun. Cut a piece of wire mesh an inch (2.54 cm) larger than the frame opening. Staple the screening to each of the six frames. Attach the bottom and the top of the screen first, then work around the frame until the screen is flat and secure. Use a utility knife to cut off any excess material. You can also use a window screen, however, it may not be as durable or easy for your cat to see through as a wire mesh. You can also use wire mesh to create outdoor tunnels for your cats to travel through. Leave one of the bottom screen frames empty and build a ramp or a staircase to the ground so your cat can get up and down safely.
Adding a Roof to the Catio

Assemble the framing of the roof using plywood and 1x4 boards. Use a miter saw to cut 3 1x4 boards (two for the side, one for the front) that are about 6 inches (15.24 cm) longer than the side and front trim boards. Drill two 1 ⅝ inch (4.12 cm) screws about 1 inch (2.54 cm) apart into each of the sides of the 1x4 boards, creating a U-shape. Cut a plywood sheet the same height and width as the roof. Add wood glue to the top of the 1x4 boards, place the plywood sheet on top, and attach it with more screws. The extra 6 inches will create an overhang that can allow rain to run off away from the inside of the catio. The free end of the U-shape will attach flush to the house along with the rest of the catio. To help protect the catio against the rain, use tin snips to cut and attach an aluminum drip edge to the side of the 1x4 boards using a bead of roofing cement and 1 ⅝ inch (4.12 cm) screws. Repeat this process for the other two sides of the roof, allowing the drip edges to overlap each other.
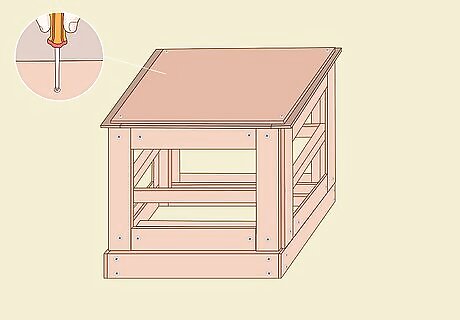
Attach the roof to the upper frame, with the trim boards facing up. Position the upper frame so the trim boards are facing up. To angle the roof so it will shed water away from the house, drill a 4-inch (10.16 cm) 1x4 scrap to the top of the frame’s front-facing crosspiece flush with the rear trim board. Center the roof on the frame so that the plywood on the free end of the U-shape is flush with the crosspieces. Drill seven 1 ⅝ inch (4.12 cm) screws through the top of the roof into the two 2x2 side crosspieces and the 2x2 support.

Apply roofing cement, then unroll roofing material on the plywood. Spread roofing cement using a putty knife on the plywood surface of the roof. Unroll the rolled roofing (any color will do) onto the cement, making sure it’s even as you press it into place. Use a utility knife to trim the roofing flush against the sides of the roof. If you attached an aluminum drip to the side of your roof, trim the roofing so it just covers the caps.
Attaching the Window Catio Brackets
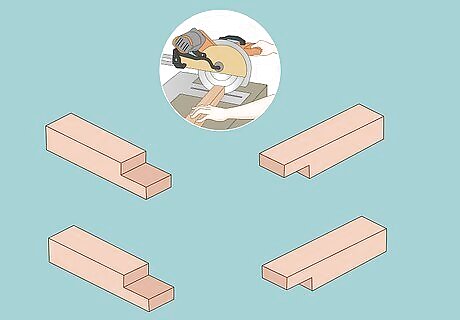
Cut half-lap joints into four 4x4 wooden boards. Clamp the two boards side by side, with their ends even with each other. Measure and draw a line about 3 ½ inches (8.89 cm) from the ends of both boards. Using a jigsaw, cut through half the thickness of the boards, creating a series of 1 cm wide notches until you reach the penciled-in line. Use a hammer and chisel to knock away the wood silvers and smooth out the surface of the joint. Unclamp the boards and place the half-lap joint sides together, forming a 90° angle. Repeat this step for the second bracket. Optionally, you can set your circular saw to a 40° angle and trim 1 ½ inches (3.81 cm) off each face to create decorative pyramid shapes on the ends of the brackets.
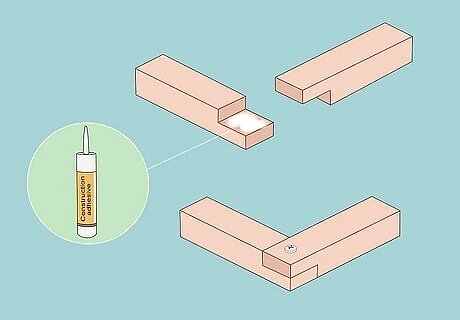
Assemble the brackets. Apply a construction adhesive to each side of the half-lap joints and fasten them together with two 3-inch (7.62 cm) deck screws. Cut two 4x4 cedar boards to run diagonally in the corners of each brace. Use a miter saw to cut each end at a 45° angle. Position the diagonal brace in between the two half-lap joined wooden boards and drill 3-inch (7.62 cm) deck screws through the ends into the bracket. Repeat this step on the second bracket. Coat any exposed ends with a layer of primer and paint or wood stain.
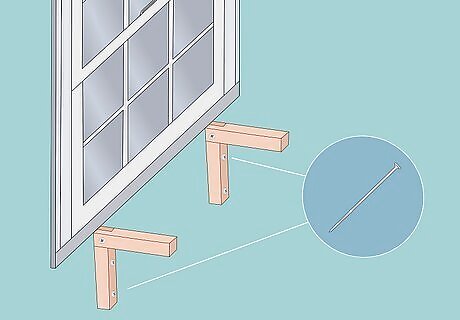
Attach the brackets to the house, underneath the windowsill. Drill the brackets into the side of the house using 9-inch (22.86 cm) structural screws. Place a level on top of each bracket to make sure they’re aligned evenly. Screw through both sides of the bracket’s joint at a 30° angle into the house with two additional structural screws. Repeat this process with the second bracket. You can drill a shallow ⅜ inch (0.95 cm) pilot hole through the lower leg before you drill the structural screw in. This can allow you to push plastic screw caps over the heads of the screws so that they’re hidden from view. You can also make the catio extend all the way to the ground. Just make sure to install a hard floor or extend the catio frame below the ground so small animals can’t dig their way inside. Ensure that each additional level you build includes a shelf so the cat can safely travel up to the window.
Connecting the Catio to the Window

Center and stack the catio frames on top of the brackets. Clamp the top and the bottom of the two frames together with the roof facing upward and half-drill into the crosspieces with 2 ¼ inch (5.7 cm) screws every 10 inches (25.4 cm) along the frame. Drill 3-inch (7.62 cm) deck screws through the lower frame’s 2x2 side crosspieces into the brackets. Place the plywood floor into the catio and drill it into the crosspieces and support. If the back of the catio doesn’t line up flush against the house, use 1 ⅝ inch (4.12 cm) screws to attach 1x4 boards to pad out the window casing.

Create a cat shelf so the cat can climb up to the upper catio frame. Check that both catio frames are level both vertically and horizontally. Measure the width of the cat shelf, from one-half of the back and side of the catio from the inner edge of the corner crosspiece. Then measure the length of the shelf from the middle of the back of the catio to the middle of the side of the catio. Use a circular saw to cut a triangular-shaped cat shelf from 1x4 boards. Fit the boards that make up the shelf between the upper and lower catio frames and drill downward into the two horizontal crosspieces using 1 ⅝ inch (4.12 cm) screws.
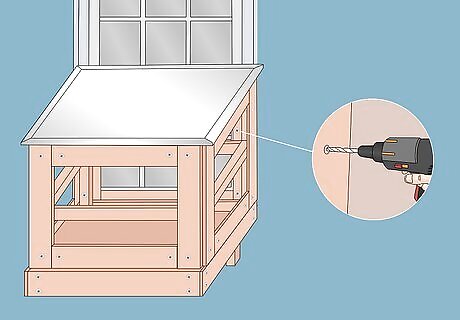
Drill the frame into the house. Using 3-inch (7.62 cm) deck screws, drill the whole frame through the 2x2 horizontal and vertical crosspieces into the window trim of the house about every 10 inches (25.4 cm) around the frame. Then, use a level to make sure the catio is completely level and plumb and fully drill all the screws in.
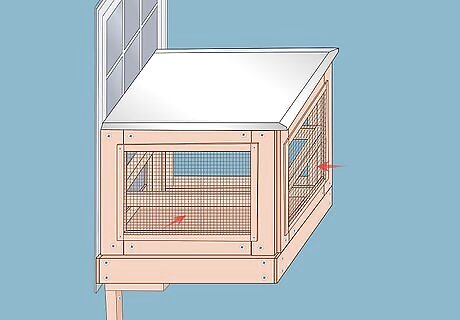
Slide the screened side panels into place. Put the screen against the frame, mesh facing the inside, with the front edges flush to the outside corners of the catio frame. Drive four 1 ⅝ screws into each corner, and repeat the process for each screen. You can also use a ⅜ inch (0.95 cm) spade drill bit to drill pilot holes for button plugs in each corner of the screen panel before drilling in the screen panels.
Decorating Your Catio

Consider adding cat-safe plants to the catio. Plant catnip, cat grass, cat thyme, valerian, or silvervine in small pots or planters and add them into your catio to give your feline friends some additional stimulation. Make sure that you place them on the bottom floor of the catio so you can water and maintain them through the window. If your cats constantly eat your houseplants, giving them edible plants can make them less likely to bother yours.

Add a bridge for your cat to climb on. Cut a 2x6 cedar board into 2-inch by 5 ½ inch (5.08 by 13.97 cm) pieces and drill holes through each end length-wise. String a coated clothesline wire through the holes on one side of all the 2-inch 2x6 pieces, then run another clothesline through the other side of the pieces to create a bridge. Use four nuts and four bolts to secure the clothesline string ends to the shelves on either side of the bridge. If your space is longer than you planned, you can always attach more wooden pieces to extend the length of the bridge. If you have an elder cat, they might just be happy lounging and sunbathing—think about what your cat would love so they can happily take in the sights.
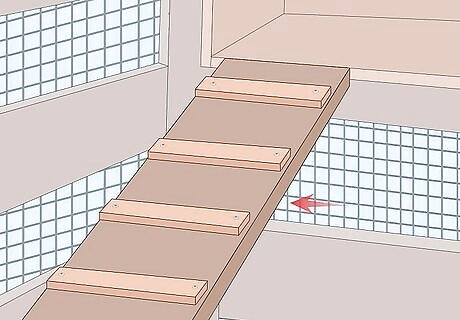
Create simple wooden ramps to provide access to shelves. Take a 2x6 board and attach 1-inch (2.54 cm) strips of wood using 1 ⅝ inch (4.12 cm) screws to create a ramp with steps. If your catio is exposed to rain, make sure to attach grip tape or high friction surfacing to the ramp so that your cats don’t slip when they walk up it. Having places for your cat to climb can give your cat tons of active enrichment and access to the sights, smells, and sounds of the outdoors.


Comments
0 comment