
Winding the Bobbin
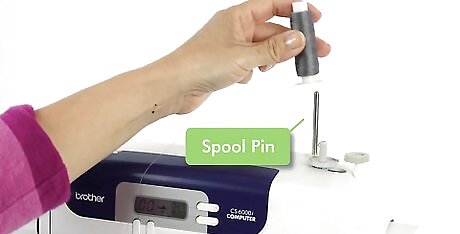
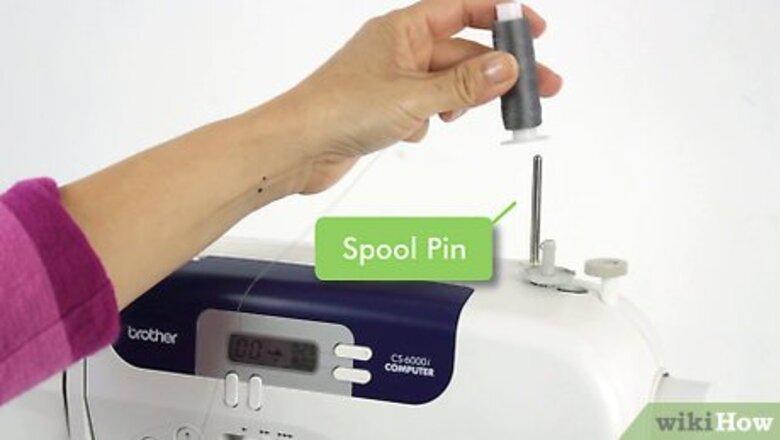
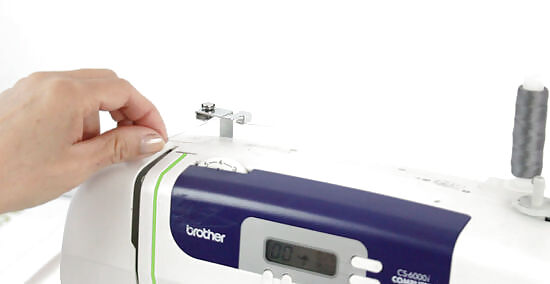
Place your thread spool on the spool pin. Place your spool of thread on the top of the sewing machine, on the spool pin. The spool should be turned so that the thread will be released counter-clockwise. Check the top of your machine for a diagram before you place your thread spool. Some machines have a small diagram on top that shows where the thread spool should go.
Pull the thread out. Tug at the thread to pull it out, and wind it around the bobbin winding tension disc at the top of the sewing machine. This part is on the opposite side of the sewing machine, above the needle. The disc may also have a small wire attached to it that will help to hold the thread in place.

Thread the bobbin. Next, take the end of the thread and insert it through one of the holes in your bobbin. Then, wrap the thread around the bobbin a few times to secure it. Keep in mind that there are also pre-threaded bobbins available in craft stores if you do not wish to thread your own bobbins.
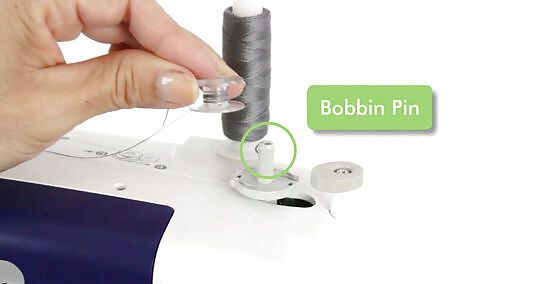
Put the bobbin on the bobbin pin. The bobbin pin is a small pin that is likely on the top of your machine near where the spool pin is located. Place the bobbin on this pin. Then, slide the pin over to the right to lock the bobbin in place for winding. You should hear the bobbin pin click into place when you slide it over.
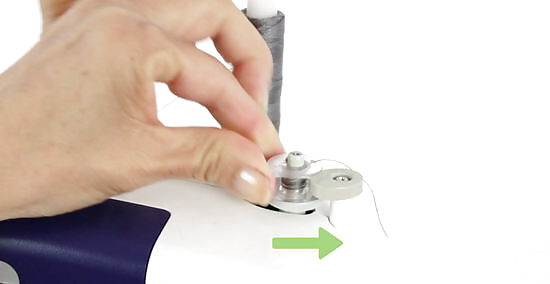
Start the bobbin winder. Start winding the bobbin for a few seconds by pushing down on the foot pedal or by pressing the bobbin winding button (if your machine has one). Doing this will ensure that the thread is securely wrapped around the bobbin. After a few rotations, you can stop for a moment to cut off the excess thread that is sticking out of the hole in the bobbin.
Finish winding the bobbin. Apply gentle pressure to the floor pedal again or flip the winder back on and allow it to completely fill the bobbin with thread. Your winder may stop on its own when the bobbin is full, but if it doesn’t then stop it when the thread is almost even with the edge of the bobbin spool.
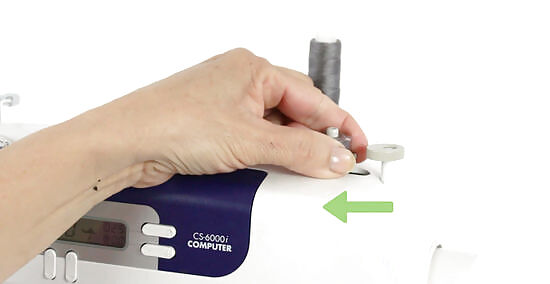
Remove the bobbin. Slide the bobbin pin over to the left and remove the bobbin. The thread will still be attached to the thread spool as well as the bobbin, so cut the excess with a pair of scissors, leaving a 2–3 inch (5.1–7.6 cm) tail. When your bobbin is full, you will be ready to start threading your machine.
Threading the Upper Half of the Machine
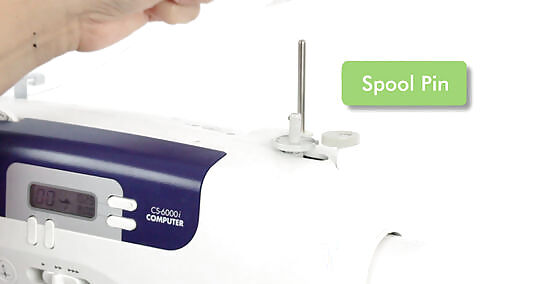
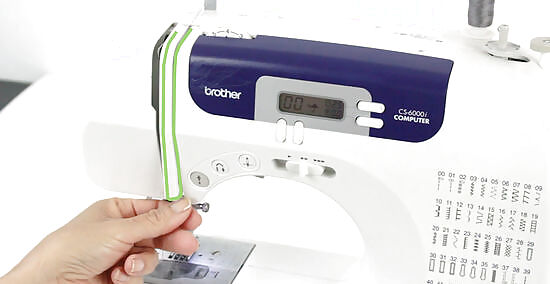
Place the thread spool onto the spool pin. The spool pin is located on the right side of the machine. It is the larger of the two pins on this side. Place your thread onto the spool pin and pull a bit of thread away from it. The spool may be more stable if you place it so that the thread is coming from under the spool when you look down at it. If your machine has a diagram, then you can check it to see where the spool pin is located and which direction the thread should be going.
Wrap the thread around the thread guide. Pull the end of the thread out from the spool on the top of the sewing machine. Bring the thread across the top of the machine and through the thread guide on the top of the machine. This will look like a silver piece that is sticking out from the top. Make sure to bring the thread around the back side of the guide and towards the front where the “U” shaped area for your thread to go through next is located. There will likely be printed guidelines on the top of the machine diagramming how to work the thread through this area.
Pull the thread down. Follow the directional arrows on your sewing machine by pulling the thread through the guide and towards you. You will be looping it around the tension discs on the bottom, and then back up towards the top along and through the second thread guide. This will ultimately create a long, narrow “U” shape with your thread.
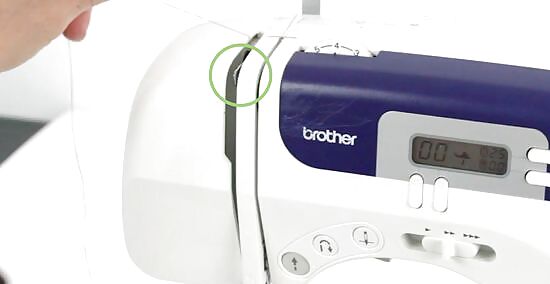
Wrap the thread around the takeup lever. After you’ve completed the “U” shape, you will need to wind the thread around the takeup lever at the top and then back down towards the needle. The take-up lever is a metal piece sticking out of the second thread guide. This metal piece will have a hole cut out near the top that the thread needs to go through. Completing this motion will create a large, narrow, sideways “S” with the thread.

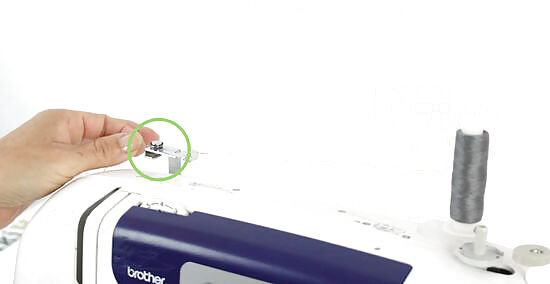
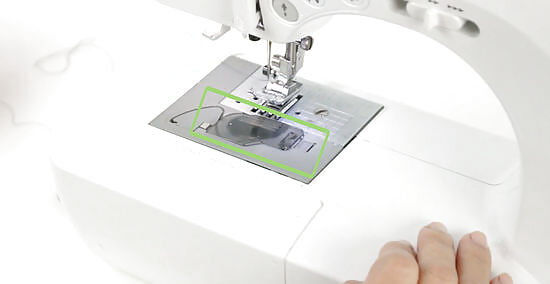
Thread the needle. Pull the thread back down the machine towards the needle. Thread the needle through the small eye in the needle and pull several inches of thread out the other side. Then, pull this thread through gap in the small metal presser foot directly underneath it. The upper half of your machine is now threaded and you just need to thread the lower half before you can use the machine.
Threading the Lower Half of the Machine
Remove the covering on the lower compartment. The bobbin's case is under a small door that is either directly below or to the side in front of your needle. Find this chamber and open it. This will reveal the bobbin case, which is where you will need to place your threaded bobbin. The compartment cover should come off easily. If it does not, then check to make sure that this is actually the compartment. In some machines, the bobbin case will also have a small cover. Make sure to remove this as well to reveal the slot for your bobbin.
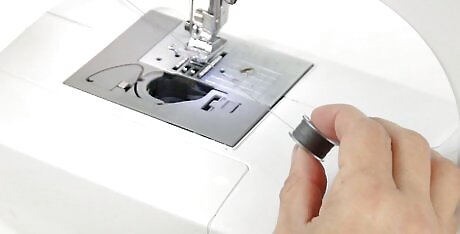
Unwind a few inches of thread from the bobbin. Before placing the bobbin into its compartment, pull the end of the thread to unwind a few inches of thread from the bobbin. This will be enough to catch when you turn the handwheel. Make sure that you unwind enough thread to catch. A few inches is usually plenty, but unwind too little thread and the thread may not catch.

Place the bobbin in the compartment below the needle. Check the diagram on the bobbin compartment to see what direction your thread should be going. Place the bobbin into the compartment with the thread going in the direction indicated by the diagram. You should be able to pull on the tail of thread to the right and the thread should unwind fairly easily. Close the compartment when the bobbin is in place. Make sure to replace the bobbin case cover (if your machine has one) as well.
Expose the bobbin thread. The bobbin thread is still hiding under the plate below the needle. To bring out the end of it, grasp the round dial/wheel on the right side of your sewing machine. Turn it towards you a few times, and the end of the thread should pop out. Grab it and pull so that a few inches of the thread are exposed. If the thread does not catch, then check the compartment to see if the thread is going in the right direction and make sure that the thread moves easily when you pull on it. If it does not, then it might be too full and you may need to unwind some of the thread.


Comments
0 comment