views
Tying a Basic Slip Bobber Rig
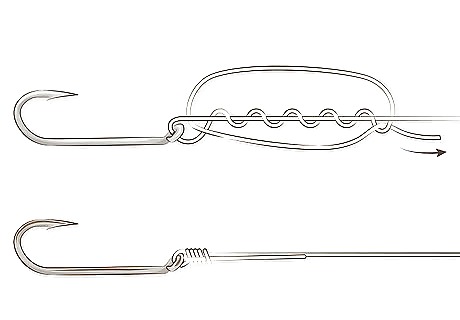
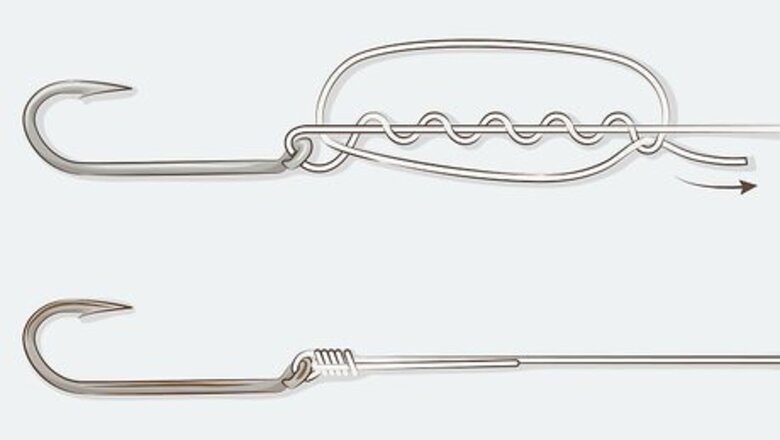
Tie a fishing hook onto your line using an improved clinch knot. Pass the end of your leader line through the eye of the hook until you have 8–10 inches (20–25 cm) of loose line on the open side. From here, loop the line around your index finger and double it back on itself, making sure to keep your finger inside the loop. Wind the line around itself for 4-5 turns, then thread the end through the finger loop and pull it until it’s nice and tight. A basic #6 or #8 hook with a long shank (the straight section between the eye and the point) will work just fine for most types of catch, especially on your first few outings while you’re still getting used to your rod. The improved clinch knot makes a wonderful all-purpose knot. You can use it to secure each subsequent piece of tackle you choose to add to your line.
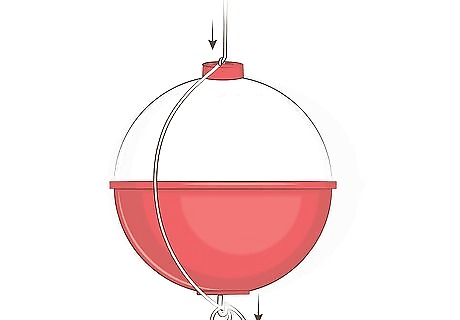
Snap a bobber onto your line at a height matching the depth of the water. Position the bobber so that it’s about the same distance from the hook as the distance between the surface and bottom of the water. To secure the bobber, loop your leader or main line around the hook at the bottom of the device and, keeping the line taut, guide it up the opposite side and snag it on the hook at the top. The addition of a bobber will allow you to make longer casts into deep waters and keep your bait suspended just above the bottom of the water, where it will be easily accessible to fish like crappie, walleye, and catfish. You can also fish this rig without a bobber if you’re fishing deeper waters from a boat.
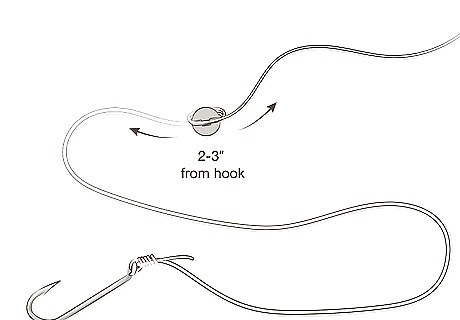
Place one or two split shot sinkers 2–3 inches (5.1–7.6 cm) above the hook. Press your line into the narrow groove running through the middle of the sinkers. When picking out your sinkers, use enough weight to bring the bait closer to the bottom, but not enough to weigh down your line. Your sinkers will prevent your line from drifting in deep waters and strong currents. You also have the option of using sinkers with rings, loops, or eyes, though you’ll need to tie these directly to your line at the desired point.
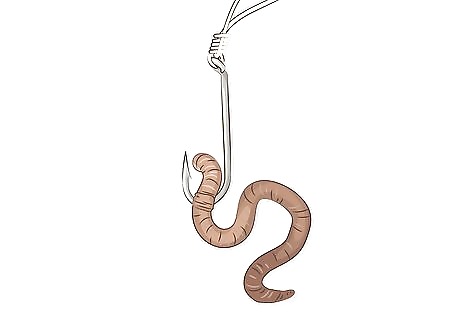
Bait your hook with an appropriate type of bait for the fish you’re after. Pierce the thickest part of your nightcrawler, leech, or minnow with the point of the hook, angling it so that the bulk of the bait is centered around the curve of the hook. Genuine bait is better at fooling most types of fish than fancy lures, and is also far less costly (especially if you catch your own). It’s possible for both live and dead bait to come loose quite easily. Be prepared to re-bait your hook several times during a single trip, if necessary. If you’d rather try your chances with a lure, tie it onto your line using an improved clinch or unit knot (the single version of the knot you used to tie your leader to your main line).Tip: Slip bobber rigs are an effective, no-frills choice for still-fishing deep, brushy waters from shore with live bait.
Setting up a Weedless Texas Rig
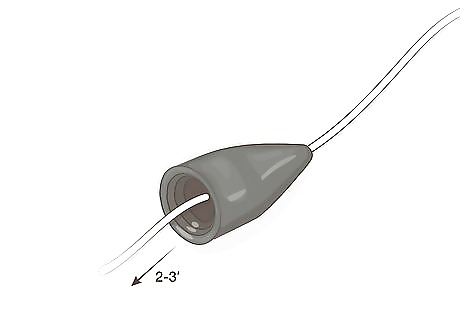
Run a bullet sinker onto the end of your fishing line. Thread the narrow end of the weight onto the line carefully and slide it down 2–3 feet (0.61–0.91 m) to give yourself plenty of workable line. As you prepare for the next step, keep a firm hold on the loose end of the line to keep the sinker from slipping right back off. Bullet sinkers come in a variety of weights, ranging from ⁄8 ounce (3.5 g) to more than 2 ounces (57 g). Lighter weights are useful for creating a slow-falling lure in shallow waters, while heavier sinkers are best suited for casting into thick bushes and penetrating matted undergrowth.Tip: When fishing in areas with thick cover, peg your sinker with a toothpick, rubber band, or bobber stop. This will keep the weight closer to the lure, making it easier to get through various environmental obstructions.
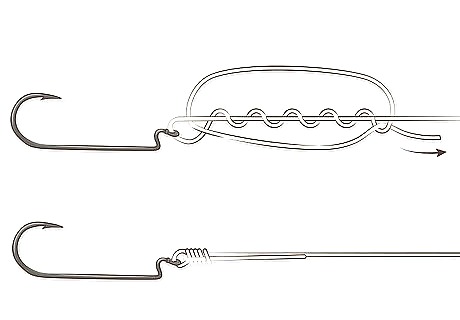
Tie a worm hook onto the end of your line using an improved clinch knot. Round-bend and wide gap hooks tend to work best for a standard Texas rig. Guide the line through the eye of the hook, then double it over on itself to start your knot. Once it’s nice and tight, snip off the excess line on the tag end with a pair of pliers. Be sure to wind the line around itself a minimum of 4 turns to ensure that the finished knot will hold. A 3/0 or 4/0 hook will be the ideal size for most types of soft rubber lures.
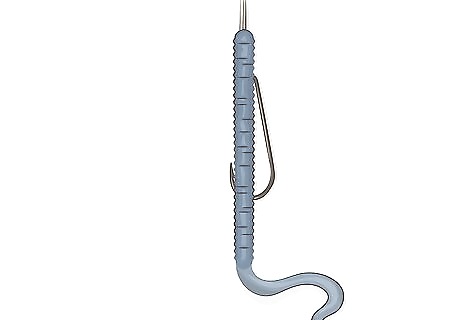
Bait your hook so that it curves back into the body of the lure. First, insert the point of the hook into the molded hole in the lure. Then, push the lure up the shank until the hole end just covers the eye where your line is tied. Finally, force the point of the hook into the lure at the spot where it rests naturally against the side. The completed hook should have a rough “D” shape. This type of hook presentation is known as “weedless,” meaning it will hook fish who take the bait but won’t become snagged on any surrounding objects or cover by accident. The Texas rig is a fast, simple, versatile setup—you can use it to fish any type of soft lure in both deep and shallow water, cover or no cover, with minimal preparation. It’s a favorite amongst bass anglers.
Using a Carolina Rig for Deep-Water Fishing
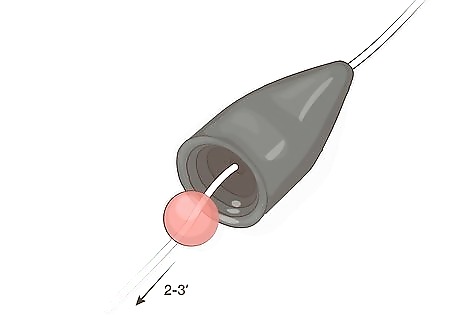
Slip a heavy sinker weight onto your line, followed by a bead. Thread the sinker onto your line and pull it down until you have an ample amount of room to tie on your other tackle. Once you’ve got your sinker in place, slide on a glass, metal, or plastic bead. Don’t place any kind of buffer between the sinker and the bead. When the two pieces butt up against each other, they’ll create an audible clacking noise, which will help draw fish in from a distance.
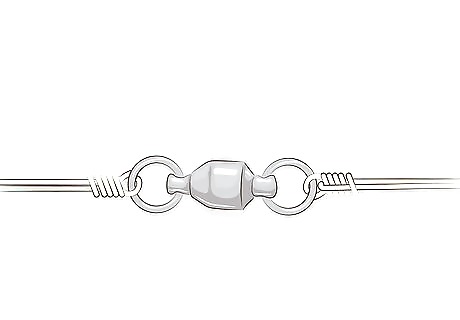
Add a barrel swivel between the end of your line and a short leader line. Tie the end of your main line to one eye of the swivel and a 14–18 in (36–46 cm) leader to the other, using an improved clinch knot for both lines. Your leader line will then be able to spin as your hook or lure moves, minimizing the chance of a tangle or break. Swivels are jointed connector pieces that allow a leader line to rotate freely on the main line, which will reduce its risk of snapping. For your leader line, you can either use a standard monofilament line or a special fluorocarbon line, which is designed to be practically invisible underwater. Steel leaders are also available for wrangling particular large or aggressive types of catch.Tip: Another benefit of tying on a separate leader line is that it lets you change baits quickly and easily.
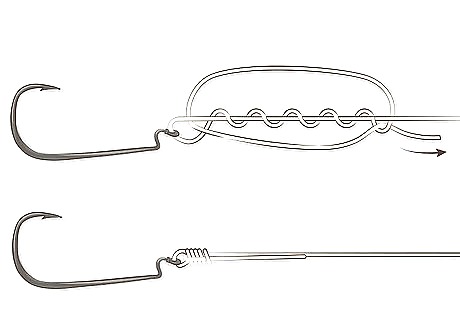
Tie a worm hook onto the end of the leader. Most anglers go with an offset shank wide gap hook when setting up a Carolina rig, though you could opt for an extra-wide gap hook, if you prefer. Use an improved clinch knot to secure the hook to your line. As always, select a hook size that’s appropriate for the type of bait you’ll be fishing.
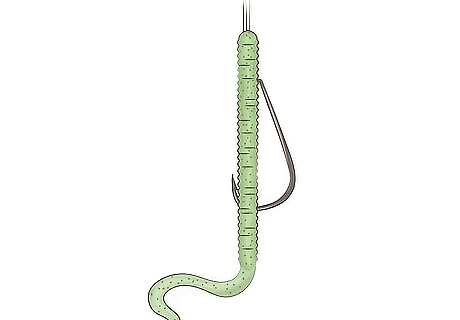
Bait your hook with any type of soft plastic lure. Leech, lizard, creature, and tube lures are all popular choices for Carolina rig setups. Insert the point of the hook through the small hole at the end of the lure, then arrange the lure so that it conceals as much of the hook as possible. You also have the option of fishing a Carolina rig with a plug or live bait, as well. One of the biggest advantages of the Carolina rig is that it gives you more of a feel for the terrain at the bottom of the water you’re fishing, helping you detect rocks, brush, drop-offs, and other irregularities. Carolina rig variations are most commonly used for deep-water fishing, but can also be drifted or slow-trolled.
Rigging a Topwater Lure
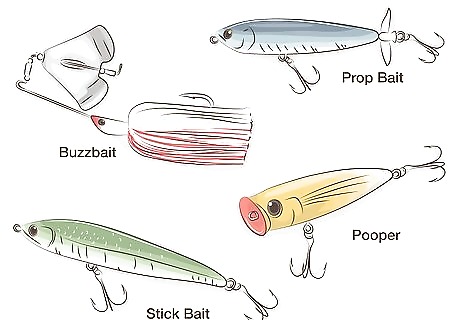
Choose the right lure for the conditions you’re fishing. Topwater lures come in lots of different styles, including buzzbaits, poppers (also called “chuggers”), prop baits, and stick baits. Despite their differences in appearance, each of these lures is designed for the same specific purpose: to float on the surface of the water and generate motion and noise that will entice curious fish up for a bite. Buzzbait lures feature a series of tiny blades that churn and sputter as you drag them across the surface of the water. They’ll be most noticeable to your target in calm, shallow waters. Poppers and chuggers are molded with concave faces, which cause them to “chug” noisily through the water when pulled. They can come in handy when your catch is confined to a single concentrated area. Prop baits are fitted with miniature propellers. A light tugging action is all it takes to send them skittering along. This constant movement makes them perfect for fishing rough, choppy waters or calmer areas during rainstorms. When maneuvered correctly, stick baits dart back and forth in a zig-zag pattern known as “walking the dog,” which bass and many other big fish find irresistible. They’re best reserved for calm, clear waters to attract maximum attention.
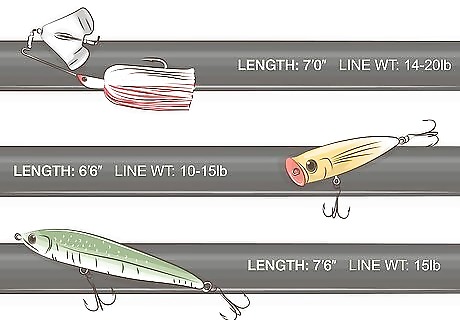
Make sure your lure is suitable for your rod’s technical specifications. When fishing a buzzbait lure, equip yourself with a 6.5–7 ft (2.0–2.1 m) baitcasting rod spooled with 14–20 lb (220–320 oz) monofilament line. For poppers and chuggers, reach for a 6.5 ft (2.0 m) baitcaster loaded with 10–15 lb (160–240 oz) monofilament. A larger 7–7.5 ft (2.1–2.3 m) baitcaster with heavy 30 lb (480 oz) braid or 15 lb (240 oz) monofilament will offer the most control for walking-the-dog with stick baits. Unlike other types of tackle, it's important that topwater lures be paired with the right equipment in order to guarantee that they'll work the way they're supposed to. Rigging a topwater lure on the wrong type of rod could impact factors like casting distance, buoyancy, and your ability to “twitch” your lure in an organic-looking way that won’t tip off your catch.
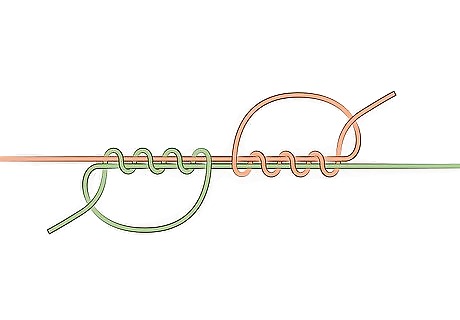
Attach an 18–24 in (46–61 cm) leader line to your main line. The best way to tie one line to another is to make use of a “double-uni” knot. Overlap the ends of the two lines in opposite directions and double the end of one line over on itself so that it forms a small loop. Wrap the remaining line around both the inside of the loop and the opposite line 3-6 times. Pull the loose end firmly to tighten the knot, then repeat with the opposite line. You can cut your leader longer or shorter, if you like. It just needs to be long enough to provide a little shock absorption and reduce tension on your main line. When tying a monofilament line to a braided line, wrap the monofilament line 4-5 times and the braided line 6-8 times to ensure that the strength is distributed evenly between both lines. Tip: Many experienced anglers recommend using a standard monofilament line when rigging a leader for a topwater lure. Since monofilament is so lightweight, it won’t weigh down your lure the way a fluorocarbon leader can.
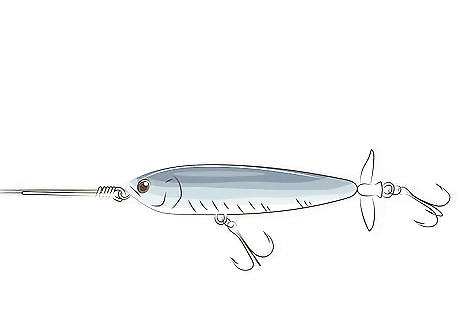
Tie your lure onto the end of your leader line using an improved clinch knot. Settling on an appropriate rod-bait pairing is the hardest part of rigging a topwater lure. With that out of the way, all that’s left to do is tie the sucker on and get casting! Some experts have been known to remove the metal split rings from their topwater lures and tie their leader lines directly to the end of the lure instead. Cutting the excess weight can help prevent the lure from nose-diving, an action that fish may find suspicious.


Comments
0 comment